Demo
2D Animal Pose Demo
2D Animal Pose Image Demo
Using gt bounding boxes as input
We provide a demo script to test a single image, given gt json file.
Pose Model Preparation: The pre-trained pose estimation model can be downloaded from model zoo. Take macaque model as an example:
python demo/top_down_img_demo.py \
    ${MMPOSE_CONFIG_FILE} ${MMPOSE_CHECKPOINT_FILE} \
    --img-root ${IMG_ROOT} --json-file ${JSON_FILE} \
    --out-img-root ${OUTPUT_DIR} \
    [--show --device ${GPU_ID or CPU}] \
    [--kpt-thr ${KPT_SCORE_THR}]
Examples:
python demo/top_down_img_demo.py \
    configs/animal/2d_kpt_sview_rgb_img/topdown_heatmap/macaque/res50_macaque_256x192.py \
    https://download.openmmlab.com/mmpose/animal/resnet/res50_macaque_256x192-98f1dd3a_20210407.pth \
    --img-root tests/data/macaque/ --json-file tests/data/macaque/test_macaque.json \
    --out-img-root vis_results
To run demos on CPU:
python demo/top_down_img_demo.py \
    configs/animal/2d_kpt_sview_rgb_img/topdown_heatmap/macaque/res50_macaque_256x192.py \
    https://download.openmmlab.com/mmpose/animal/resnet/res50_macaque_256x192-98f1dd3a_20210407.pth \
    --img-root tests/data/macaque/ --json-file tests/data/macaque/test_macaque.json \
    --out-img-root vis_results \
    --device=cpu
2D Animal Pose Video Demo
We also provide video demos to illustrate the results.
Using the full image as input
If the video is cropped with the object centered in the screen, we can simply use the full image as the model input (without object detection).
python demo/top_down_video_demo_full_frame_without_det.py \
    ${MMPOSE_CONFIG_FILE} ${MMPOSE_CHECKPOINT_FILE} \
    --video-path ${VIDEO_PATH} \
    --out-video-root ${OUTPUT_VIDEO_ROOT} \
    [--show --device ${GPU_ID or CPU}] \
    [--kpt-thr ${KPT_SCORE_THR}]
Note that ${VIDEO_PATH} can be the local path or URL link to video file.
Examples:
python demo/top_down_video_demo_full_frame_without_det.py \
    configs/animal/2d_kpt_sview_rgb_img/topdown_heatmap/fly/res152_fly_192x192.py \
    https://download.openmmlab.com/mmpose/animal/resnet/res152_fly_192x192-fcafbd5a_20210407.pth \
    --video-path https://user-images.githubusercontent.com/87690686/165095600-f68e0d42-830d-4c22-8940-c90c9f3bb817.mp4 \
    --out-video-root vis_results

Using MMDetection to detect animals
Assume that you have already installed mmdet.
COCO-animals
In COCO dataset, there are 80 object categories, including 10 common animal categories (15: ‘bird’, 16: ‘cat’, 17: ‘dog’, 18: ‘horse’, 19: ‘sheep’, 20: ‘cow’, 21: ‘elephant’, 22: ‘bear’, 23: ‘zebra’, 24: ‘giraffe’)
For these COCO-animals, please download the COCO pre-trained detection model from MMDetection Model Zoo.
python demo/top_down_video_demo_with_mmdet.py \
    ${MMDET_CONFIG_FILE} ${MMDET_CHECKPOINT_FILE} \
    ${MMPOSE_CONFIG_FILE} ${MMPOSE_CHECKPOINT_FILE} \
    --video-path ${VIDEO_PATH} \
    --out-video-root ${OUTPUT_VIDEO_ROOT} \
    --det-cat-id ${CATEGORY_ID}
    [--show --device ${GPU_ID or CPU}] \
    [--bbox-thr ${BBOX_SCORE_THR} --kpt-thr ${KPT_SCORE_THR}]
Note that ${VIDEO_PATH} can be the local path or URL link to video file.
Examples:
python demo/top_down_video_demo_with_mmdet.py \
    demo/mmdetection_cfg/faster_rcnn_r50_fpn_coco.py \
    https://download.openmmlab.com/mmdetection/v2.0/faster_rcnn/faster_rcnn_r50_fpn_2x_coco/faster_rcnn_r50_fpn_2x_coco_bbox_mAP-0.384_20200504_210434-a5d8aa15.pth \
    configs/animal/2d_kpt_sview_rgb_img/topdown_heatmap/horse10/res50_horse10_256x256-split1.py \
    https://download.openmmlab.com/mmpose/animal/resnet/res50_horse10_256x256_split1-3a3dc37e_20210405.pth \
    --video-path https://user-images.githubusercontent.com/15977946/173124855-c626835e-1863-4003-8184-315bc0b7b561.mp4 \
    --out-video-root vis_results \
    --bbox-thr 0.1 \
    --kpt-thr 0.4 \
    --det-cat-id 18

Other Animals
For other animals, we have also provided some pre-trained animal detection models (1-class models). Supported models can be found in det model zoo. The pre-trained animal pose estimation model can be found in pose model zoo.
python demo/top_down_video_demo_with_mmdet.py \
    ${MMDET_CONFIG_FILE} ${MMDET_CHECKPOINT_FILE} \
    ${MMPOSE_CONFIG_FILE} ${MMPOSE_CHECKPOINT_FILE} \
    --video-path ${VIDEO_PATH} \
    --out-video-root ${OUTPUT_VIDEO_ROOT} \
    [--det-cat-id ${CATEGORY_ID}]
    [--show --device ${GPU_ID or CPU}] \
    [--bbox-thr ${BBOX_SCORE_THR} --kpt-thr ${KPT_SCORE_THR}]
Note that ${VIDEO_PATH} can be the local path or URL link to video file.
Examples:
python demo/top_down_video_demo_with_mmdet.py \
    demo/mmdetection_cfg/cascade_rcnn_x101_64x4d_fpn_1class.py \
    https://download.openmmlab.com/mmpose/mmdet_pretrained/cascade_rcnn_x101_64x4d_fpn_20e_macaque-e45e36f5_20210409.pth \
    configs/animal/2d_kpt_sview_rgb_img/topdown_heatmap/macaque/hrnet_w32_macaque_256x192.py \
    https://download.openmmlab.com/mmpose/animal/hrnet/hrnet_w32_macaque_256x192-f7e9e04f_20210407.pth \
    --video-path https://user-images.githubusercontent.com/15977946/173135633-1c54a944-4f01-4747-8c2e-55b8c83be533.mp4 \
    --out-video-root vis_results \
    --bbox-thr 0.5 \
    --kpt-thr 0.3 \
    --radius 9 \
    --thickness 3

Speed Up Inference
Some tips to speed up MMPose inference:
For 2D animal pose estimation models, try to edit the config file. For example,
set
flip_test=Falsein macaque-res50.set
post_process='default'in macaque-res50.
2D Face Keypoint Demo

2D Face Image Demo
Using gt face bounding boxes as input
We provide a demo script to test a single image, given gt json file.
Face Keypoint Model Preparation: The pre-trained face keypoint estimation model can be found from model zoo. Take aflw model as an example:
python demo/top_down_img_demo.py \
    ${MMPOSE_CONFIG_FILE} ${MMPOSE_CHECKPOINT_FILE} \
    --img-root ${IMG_ROOT} --json-file ${JSON_FILE} \
    --out-img-root ${OUTPUT_DIR} \
    [--show --device ${GPU_ID or CPU}] \
    [--kpt-thr ${KPT_SCORE_THR}]
Examples:
python demo/top_down_img_demo.py \
    configs/face/2d_kpt_sview_rgb_img/topdown_heatmap/aflw/hrnetv2_w18_aflw_256x256.py \
    https://download.openmmlab.com/mmpose/face/hrnetv2/hrnetv2_w18_aflw_256x256-f2bbc62b_20210125.pth \
    --img-root tests/data/aflw/ --json-file tests/data/aflw/test_aflw.json \
    --out-img-root vis_results
To run demos on CPU:
python demo/top_down_img_demo.py \
    configs/face/2d_kpt_sview_rgb_img/topdown_heatmap/aflw/hrnetv2_w18_aflw_256x256.py \
    https://download.openmmlab.com/mmpose/face/hrnetv2/hrnetv2_w18_aflw_256x256-f2bbc62b_20210125.pth \
    --img-root tests/data/aflw/ --json-file tests/data/aflw/test_aflw.json \
    --out-img-root vis_results \
    --device=cpu
Using face bounding box detectors
We provide a demo script to run face detection and face keypoint estimation.
Please install face_recognition before running the demo, by pip install face_recognition.
For more details, please refer to https://github.com/ageitgey/face_recognition.
python demo/face_img_demo.py \
    ${MMPOSE_CONFIG_FILE} ${MMPOSE_CHECKPOINT_FILE} \
    --img-root ${IMG_ROOT} --img ${IMG_FILE} \
    --out-img-root ${OUTPUT_DIR} \
    [--show --device ${GPU_ID or CPU}] \
    [--kpt-thr ${KPT_SCORE_THR}]
python demo/face_img_demo.py \
    configs/face/2d_kpt_sview_rgb_img/topdown_heatmap/aflw/hrnetv2_w18_aflw_256x256.py \
    https://download.openmmlab.com/mmpose/face/hrnetv2/hrnetv2_w18_aflw_256x256-f2bbc62b_20210125.pth \
    --img-root tests/data/aflw/ \
    --img image04476.jpg \
    --out-img-root vis_results
2D Face Video Demo
We also provide a video demo to illustrate the results.
Please install face_recognition before running the demo, by pip install face_recognition.
For more details, please refer to https://github.com/ageitgey/face_recognition.
python demo/face_video_demo.py \
    ${MMPOSE_CONFIG_FILE} ${MMPOSE_CHECKPOINT_FILE} \
    --video-path ${VIDEO_PATH} \
    --out-video-root ${OUTPUT_VIDEO_ROOT} \
    [--show --device ${GPU_ID or CPU}] \
    [--kpt-thr ${KPT_SCORE_THR}]
Note that ${VIDEO_PATH} can be the local path or URL link to video file.
Examples:
python demo/face_video_demo.py \
    configs/face/2d_kpt_sview_rgb_img/topdown_heatmap/aflw/hrnetv2_w18_aflw_256x256.py \
    https://download.openmmlab.com/mmpose/face/hrnetv2/hrnetv2_w18_aflw_256x256-f2bbc62b_20210125.pth \
    --video-path https://user-images.githubusercontent.com/87690686/137441355-ec4da09c-3a8f-421b-bee9-b8b26f8c2dd0.mp4 \
    --out-video-root vis_results
Speed Up Inference
Some tips to speed up MMPose inference:
For 2D face keypoint estimation models, try to edit the config file. For example,
set
flip_test=Falsein face-hrnetv2_w18.set
post_process='default'in face-hrnetv2_w18.
2D Hand Keypoint Demo

2D Hand Image Demo
Using gt hand bounding boxes as input
We provide a demo script to test a single image, given gt json file.
Hand Pose Model Preparation: The pre-trained hand pose estimation model can be downloaded from model zoo. Take onehand10k model as an example:
python demo/top_down_img_demo.py \
    ${MMPOSE_CONFIG_FILE} ${MMPOSE_CHECKPOINT_FILE} \
    --img-root ${IMG_ROOT} --json-file ${JSON_FILE} \
    --out-img-root ${OUTPUT_DIR} \
    [--show --device ${GPU_ID or CPU}] \
    [--kpt-thr ${KPT_SCORE_THR}]
Examples:
python demo/top_down_img_demo.py \
    configs/hand/2d_kpt_sview_rgb_img/topdown_heatmap/onehand10k/res50_onehand10k_256x256.py \
    https://download.openmmlab.com/mmpose/top_down/resnet/res50_onehand10k_256x256-e67998f6_20200813.pth \
    --img-root tests/data/onehand10k/ --json-file tests/data/onehand10k/test_onehand10k.json \
    --out-img-root vis_results
To run demos on CPU:
python demo/top_down_img_demo.py \
    configs/hand/2d_kpt_sview_rgb_img/topdown_heatmap/onehand10k/res50_onehand10k_256x256.py \
    https://download.openmmlab.com/mmpose/top_down/resnet/res50_onehand10k_256x256-e67998f6_20200813.pth \
    --img-root tests/data/onehand10k/ --json-file tests/data/onehand10k/test_onehand10k.json \
    --out-img-root vis_results \
    --device=cpu
Using mmdet for hand bounding box detection
We provide a demo script to run mmdet for hand detection, and mmpose for hand pose estimation.
Assume that you have already installed mmdet.
Hand Box Model Preparation: The pre-trained hand box estimation model can be found in det model zoo.
Hand Pose Model Preparation: The pre-trained hand pose estimation model can be downloaded from pose model zoo.
python demo/top_down_img_demo_with_mmdet.py \
    ${MMDET_CONFIG_FILE} ${MMDET_CHECKPOINT_FILE} \
    ${MMPOSE_CONFIG_FILE} ${MMPOSE_CHECKPOINT_FILE} \
    --img-root ${IMG_ROOT} --img ${IMG_FILE} \
    --out-img-root ${OUTPUT_DIR} \
    [--show --device ${GPU_ID or CPU}] \
    [--bbox-thr ${BBOX_SCORE_THR} --kpt-thr ${KPT_SCORE_THR}]
python demo/top_down_img_demo_with_mmdet.py demo/mmdetection_cfg/cascade_rcnn_x101_64x4d_fpn_1class.py \
    https://download.openmmlab.com/mmpose/mmdet_pretrained/cascade_rcnn_x101_64x4d_fpn_20e_onehand10k-dac19597_20201030.pth \
    configs/hand/2d_kpt_sview_rgb_img/topdown_heatmap/onehand10k/res50_onehand10k_256x256.py \
    https://download.openmmlab.com/mmpose/top_down/resnet/res50_onehand10k_256x256-e67998f6_20200813.pth \
    --img-root tests/data/onehand10k/ \
    --img 9.jpg \
    --out-img-root vis_results
2D Hand Video Demo
We also provide a video demo to illustrate the results.
Assume that you have already installed mmdet.
Hand Box Model Preparation: The pre-trained hand box estimation model can be found in det model zoo.
Hand Pose Model Preparation: The pre-trained hand pose estimation model can be found in pose model zoo.
python demo/top_down_video_demo_with_mmdet.py \
    ${MMDET_CONFIG_FILE} ${MMDET_CHECKPOINT_FILE} \
    ${MMPOSE_CONFIG_FILE} ${MMPOSE_CHECKPOINT_FILE} \
    --video-path ${VIDEO_PATH} \
    --out-video-root ${OUTPUT_VIDEO_ROOT} \
    [--show --device ${GPU_ID or CPU}] \
    [--bbox-thr ${BBOX_SCORE_THR} --kpt-thr ${KPT_SCORE_THR}]
Note that ${VIDEO_PATH} can be the local path or URL link to video file.
Examples:
python demo/top_down_video_demo_with_mmdet.py demo/mmdetection_cfg/cascade_rcnn_x101_64x4d_fpn_1class.py \
    https://download.openmmlab.com/mmpose/mmdet_pretrained/cascade_rcnn_x101_64x4d_fpn_20e_onehand10k-dac19597_20201030.pth \
    configs/hand/2d_kpt_sview_rgb_img/topdown_heatmap/onehand10k/res50_onehand10k_256x256.py \
    https://download.openmmlab.com/mmpose/top_down/resnet/res50_onehand10k_256x256-e67998f6_20200813.pth \
    --video-path https://user-images.githubusercontent.com/87690686/137441388-3ea93d26-5445-4184-829e-bf7011def9e4.mp4 \
    --out-video-root vis_results
Speed Up Inference
Some tips to speed up MMPose inference:
For 2D hand pose estimation models, try to edit the config file. For example,
set
flip_test=Falsein hand-res50.set
post_process='default'in hand-res50.
2D Human Pose Demo
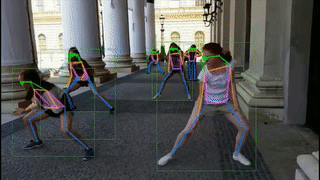
2D Human Pose Top-Down Image Demo
Using gt human bounding boxes as input
We provide a demo script to test a single image, given gt json file.
python demo/top_down_img_demo.py \
    ${MMPOSE_CONFIG_FILE} ${MMPOSE_CHECKPOINT_FILE} \
    --img-root ${IMG_ROOT} --json-file ${JSON_FILE} \
    --out-img-root ${OUTPUT_DIR} \
    [--show --device ${GPU_ID or CPU}] \
    [--kpt-thr ${KPT_SCORE_THR}]
Examples:
python demo/top_down_img_demo.py \
    configs/body/2d_kpt_sview_rgb_img/topdown_heatmap/coco/hrnet_w48_coco_256x192.py \
    https://download.openmmlab.com/mmpose/top_down/hrnet/hrnet_w48_coco_256x192-b9e0b3ab_20200708.pth \
    --img-root tests/data/coco/ --json-file tests/data/coco/test_coco.json \
    --out-img-root vis_results
To run demos on CPU:
python demo/top_down_img_demo.py \
    configs/body/2d_kpt_sview_rgb_img/topdown_heatmap/coco/hrnet_w48_coco_256x192.py \
    https://download.openmmlab.com/mmpose/top_down/hrnet/hrnet_w48_coco_256x192-b9e0b3ab_20200708.pth \
    --img-root tests/data/coco/ --json-file tests/data/coco/test_coco.json \
    --out-img-root vis_results \
    --device=cpu
Using mmdet for human bounding box detection
We provide a demo script to run mmdet for human detection, and mmpose for pose estimation.
Assume that you have already installed mmdet.
python demo/top_down_img_demo_with_mmdet.py \
    ${MMDET_CONFIG_FILE} ${MMDET_CHECKPOINT_FILE} \
    ${MMPOSE_CONFIG_FILE} ${MMPOSE_CHECKPOINT_FILE} \
    --img-root ${IMG_ROOT} --img ${IMG_FILE} \
    --out-img-root ${OUTPUT_DIR} \
    [--show --device ${GPU_ID or CPU}] \
    [--bbox-thr ${BBOX_SCORE_THR} --kpt-thr ${KPT_SCORE_THR}]
Examples:
python demo/top_down_img_demo_with_mmdet.py \
    demo/mmdetection_cfg/faster_rcnn_r50_fpn_coco.py \
    https://download.openmmlab.com/mmdetection/v2.0/faster_rcnn/faster_rcnn_r50_fpn_1x_coco/faster_rcnn_r50_fpn_1x_coco_20200130-047c8118.pth \
    configs/body/2d_kpt_sview_rgb_img/topdown_heatmap/coco/hrnet_w48_coco_256x192.py \
    https://download.openmmlab.com/mmpose/top_down/hrnet/hrnet_w48_coco_256x192-b9e0b3ab_20200708.pth \
    --img-root tests/data/coco/ \
    --img 000000196141.jpg \
    --out-img-root vis_results
2D Human Pose Top-Down Video Demo
We also provide a video demo to illustrate the results.
Assume that you have already installed mmdet.
python demo/top_down_video_demo_with_mmdet.py \
    ${MMDET_CONFIG_FILE} ${MMDET_CHECKPOINT_FILE} \
    ${MMPOSE_CONFIG_FILE} ${MMPOSE_CHECKPOINT_FILE} \
    --video-path ${VIDEO_PATH} \
    --out-video-root ${OUTPUT_VIDEO_ROOT} \
    [--show --device ${GPU_ID or CPU}] \
    [--bbox-thr ${BBOX_SCORE_THR} --kpt-thr ${KPT_SCORE_THR}] \
    [--use-multi-frames] [--online]
Note that
${VIDEO_PATH}can be the local path or URL link to video file.You can turn on the
[--use-multi-frames]option to use multi frames for inference in the pose estimation stage.If the
[--online]option is set to True, future frame information can not be used when using multi frames for inference in the pose estimation stage.
Examples:
For single-frame inference that do not rely on extra frames to get the final results of the current frame, try this:
python demo/top_down_video_demo_with_mmdet.py \
    demo/mmdetection_cfg/faster_rcnn_r50_fpn_coco.py \
    https://download.openmmlab.com/mmdetection/v2.0/faster_rcnn/faster_rcnn_r50_fpn_1x_coco/faster_rcnn_r50_fpn_1x_coco_20200130-047c8118.pth \
    configs/body/2d_kpt_sview_rgb_img/topdown_heatmap/coco/hrnet_w48_coco_256x192.py \
    https://download.openmmlab.com/mmpose/top_down/hrnet/hrnet_w48_coco_256x192-b9e0b3ab_20200708.pth \
    --video-path demo/resources/demo.mp4 \
    --out-video-root vis_results
For multi-frame inference that rely on extra frames to get the final results of the current frame, try this:
python demo/top_down_video_demo_with_mmdet.py \
    demo/mmdetection_cfg/faster_rcnn_r50_fpn_coco.py \
    https://download.openmmlab.com/mmdetection/v2.0/faster_rcnn/faster_rcnn_r50_fpn_1x_coco/faster_rcnn_r50_fpn_1x_coco_20200130-047c8118.pth \
    configs/body/2d_kpt_sview_rgb_vid/posewarper/posetrack18/hrnet_w48_posetrack18_384x288_posewarper_stage2.py \
    https://download.openmmlab.com/mmpose/top_down/posewarper/hrnet_w48_posetrack18_384x288_posewarper_stage2-4abf88db_20211130.pth  \
    --video-path https://user-images.githubusercontent.com/87690686/137440639-fb08603d-9a35-474e-b65f-46b5c06b68d6.mp4 \
    --out-video-root vis_results \
    --use-multi-frames --online
Using the full image as input
We also provide a video demo which does not require human bounding box detection. If the video is cropped with the human centered in the screen, we can simply use the full image as the model input.
python demo/top_down_video_demo_full_frame_without_det.py \
    ${MMPOSE_CONFIG_FILE} ${MMPOSE_CHECKPOINT_FILE} \
    --video-path ${VIDEO_PATH} \
    --out-video-root ${OUTPUT_VIDEO_ROOT} \
    [--show --device ${GPU_ID or CPU}] \
    [--kpt-thr ${KPT_SCORE_THR}]
Note that ${VIDEO_PATH} can be the local path or URL link to video file.
Examples:
python demo/top_down_video_demo_full_frame_without_det.py \
    configs/body/2d_kpt_sview_rgb_img/topdown_heatmap/coco/vipnas_res50_coco_256x192.py \
     https://download.openmmlab.com/mmpose/top_down/vipnas/vipnas_res50_coco_256x192-cc43b466_20210624.pth \
    --video-path https://user-images.githubusercontent.com/87690686/169808764-29e5678c-6762-4f43-8666-c3e60f94338f.mp4 \
    --show
We also provide a GPU version which can accelerate inference and save CPU workload. Assume that you have already installed ffmpegcv. If the --nvdecode option is turned on, the video reader can support NVIDIA-VIDEO-DECODING for some qualified Nvidia GPUs, which can further accelerate the inference.
python demo/top_down_video_demo_full_frame_without_det_gpuaccel.py \
    ${MMPOSE_CONFIG_FILE} ${MMPOSE_CHECKPOINT_FILE} \
    --video-path ${VIDEO_PATH} \
    --out-video-root ${OUTPUT_VIDEO_ROOT} \
    [--show --device ${GPU_ID or CPU}] \
    [--kpt-thr ${KPT_SCORE_THR}] \
    [--nvdecode]
Examples:
python demo/top_down_video_demo_full_frame_without_det_gpuaccel.py \
    configs/body/2d_kpt_sview_rgb_img/topdown_heatmap/coco/vipnas_res50_coco_256x192.py \
     https://download.openmmlab.com/mmpose/top_down/vipnas/vipnas_res50_coco_256x192-cc43b466_20210624.pth \
    --video-path https://user-images.githubusercontent.com/87690686/169808764-29e5678c-6762-4f43-8666-c3e60f94338f.mp4 \
    --out-video-root vis_results
2D Human Pose Bottom-Up Image Demo
We provide a demo script to test a single image.
python demo/bottom_up_img_demo.py \
    ${MMPOSE_CONFIG_FILE} ${MMPOSE_CHECKPOINT_FILE} \
    --img-path ${IMG_PATH}\
    --out-img-root ${OUTPUT_DIR} \
    [--show --device ${GPU_ID or CPU}] \
    [--kpt-thr ${KPT_SCORE_THR} --pose-nms-thr ${POSE_NMS_THR}]
Examples:
python demo/bottom_up_img_demo.py \
    configs/body/2d_kpt_sview_rgb_img/associative_embedding/coco/hrnet_w32_coco_512x512.py \
    https://download.openmmlab.com/mmpose/bottom_up/hrnet_w32_coco_512x512-bcb8c247_20200816.pth \
    --img-path tests/data/coco/ \
    --out-img-root vis_results
2D Human Pose Bottom-Up Video Demo
We also provide a video demo to illustrate the results.
python demo/bottom_up_video_demo.py \
    ${MMPOSE_CONFIG_FILE} ${MMPOSE_CHECKPOINT_FILE} \
    --video-path ${VIDEO_PATH} \
    --out-video-root ${OUTPUT_VIDEO_ROOT} \
    [--show --device ${GPU_ID or CPU}] \
    [--kpt-thr ${KPT_SCORE_THR} --pose-nms-thr ${POSE_NMS_THR}]
Note that ${VIDEO_PATH} can be the local path or URL link to video file.
Examples:
python demo/bottom_up_video_demo.py \
    configs/body/2d_kpt_sview_rgb_img/associative_embedding/coco/hrnet_w32_coco_512x512.py \
    https://download.openmmlab.com/mmpose/bottom_up/hrnet_w32_coco_512x512-bcb8c247_20200816.pth \
    --video-path demo/resources/demo.mp4 \
    --out-video-root vis_results
Speed Up Inference
Some tips to speed up MMPose inference:
For top-down models, try to edit the config file. For example,
set
flip_test=Falsein topdown-res50.set
post_process='default'in topdown-res50.use faster human bounding box detector, see MMDetection.
For bottom-up models, try to edit the config file. For example,
2D Pose Tracking Demo

2D Top-Down Video Human Pose Tracking Demo
We provide a video demo to illustrate the pose tracking results.
Assume that you have already installed mmdet.
python demo/top_down_pose_tracking_demo_with_mmdet.py \
    ${MMDET_CONFIG_FILE} ${MMDET_CHECKPOINT_FILE} \
    ${MMPOSE_CONFIG_FILE} ${MMPOSE_CHECKPOINT_FILE} \
    --video-path ${VIDEO_PATH} \
    --out-video-root ${OUTPUT_VIDEO_ROOT} \
    [--show --device ${GPU_ID or CPU}] \
    [--bbox-thr ${BBOX_SCORE_THR} --kpt-thr ${KPT_SCORE_THR}] \
    [--use-oks-tracking --tracking-thr ${TRACKING_THR} --euro] \
    [--use-multi-frames] [--online]
Note that
${VIDEO_PATH}can be the local path or URL link to video file.You can turn on the
[--use-multi-frames]option to use multi frames for inference in the pose estimation stage.If the
[--online]option is set to True, future frame information can not be used when using multi frames for inference in the pose estimation stage.
Examples:
For single-frame inference that do not rely on extra frames to get the final results of the current frame, try this:
python demo/top_down_pose_tracking_demo_with_mmdet.py \
    demo/mmdetection_cfg/faster_rcnn_r50_fpn_coco.py \
    https://download.openmmlab.com/mmdetection/v2.0/faster_rcnn/faster_rcnn_r50_fpn_1x_coco/faster_rcnn_r50_fpn_1x_coco_20200130-047c8118.pth \
    configs/body/2d_kpt_sview_rgb_img/topdown_heatmap/coco/res50_coco_256x192.py \
    https://download.openmmlab.com/mmpose/top_down/resnet/res50_coco_256x192-ec54d7f3_20200709.pth \
    --video-path demo/resources/demo.mp4 \
    --out-video-root vis_results
For multi-frame inference that rely on extra frames to get the final results of the current frame, try this:
python demo/top_down_pose_tracking_demo_with_mmdet.py \
    demo/mmdetection_cfg/faster_rcnn_r50_fpn_coco.py \
    https://download.openmmlab.com/mmdetection/v2.0/faster_rcnn/faster_rcnn_r50_fpn_1x_coco/faster_rcnn_r50_fpn_1x_coco_20200130-047c8118.pth \
    configs/body/2d_kpt_sview_rgb_vid/posewarper/posetrack18/hrnet_w48_posetrack18_384x288_posewarper_stage2.py \
    https://download.openmmlab.com/mmpose/top_down/posewarper/hrnet_w48_posetrack18_384x288_posewarper_stage2-4abf88db_20211130.pth  \
    --video-path https://user-images.githubusercontent.com/87690686/137440639-fb08603d-9a35-474e-b65f-46b5c06b68d6.mp4 \
    --out-video-root vis_results \
    --use-multi-frames --online
2D Top-Down Video Human Pose Tracking Demo with MMTracking
MMTracking is an open source video perception toolbox based on PyTorch for tracking related tasks. Here we show how to utilize MMTracking and MMPose to achieve human pose tracking.
Assume that you have already installed mmtracking.
python demo/top_down_video_demo_with_mmtracking.py \
    ${MMTRACKING_CONFIG_FILE} \
    ${MMPOSE_CONFIG_FILE} ${MMPOSE_CHECKPOINT_FILE} \
    --video-path ${VIDEO_PATH} \
    --out-video-root ${OUTPUT_VIDEO_ROOT} \
    [--show --device ${GPU_ID or CPU}] \
    [--bbox-thr ${BBOX_SCORE_THR} --kpt-thr ${KPT_SCORE_THR}] \
    [--use-multi-frames] [--online]
Note that
${VIDEO_PATH}can be the local path or URL link to video file.You can turn on the
[--use-multi-frames]option to use multi frames for inference in the pose estimation stage.If the
[--online]option is set to True, future frame information can not be used when using multi frames for inference in the pose estimation stage.
Examples:
For single-frame inference that do not rely on extra frames to get the final results of the current frame, try this:
python demo/top_down_pose_tracking_demo_with_mmtracking.py \
    demo/mmtracking_cfg/tracktor_faster-rcnn_r50_fpn_4e_mot17-private.py \
    configs/body/2d_kpt_sview_rgb_img/topdown_heatmap/coco/res50_coco_256x192.py \
    https://download.openmmlab.com/mmpose/top_down/resnet/res50_coco_256x192-ec54d7f3_20200709.pth \
    --video-path demo/resources/demo.mp4 \
    --out-video-root vis_results
For multi-frame inference that rely on extra frames to get the final results of the current frame, try this:
python demo/top_down_pose_tracking_demo_with_mmtracking.py \
    demo/mmtracking_cfg/tracktor_faster-rcnn_r50_fpn_4e_mot17-private.py \
    configs/body/2d_kpt_sview_rgb_vid/posewarper/posetrack18/hrnet_w48_posetrack18_384x288_posewarper_stage2.py \
    https://download.openmmlab.com/mmpose/top_down/posewarper/hrnet_w48_posetrack18_384x288_posewarper_stage2-4abf88db_20211130.pth  \
    --video-path demo/resources/demo.mp4 \
    --out-video-root vis_results \
    --use-multi-frames --online
2D Bottom-Up Video Human Pose Tracking Demo
We also provide a pose tracking demo with bottom-up pose estimation methods.
python demo/bottom_up_pose_tracking_demo.py \
    ${MMPOSE_CONFIG_FILE} ${MMPOSE_CHECKPOINT_FILE} \
    --video-path ${VIDEO_PATH} \
    --out-video-root ${OUTPUT_VIDEO_ROOT} \
    [--show --device ${GPU_ID or CPU}] \
    [--kpt-thr ${KPT_SCORE_THR} --pose-nms-thr ${POSE_NMS_THR}]
    [--use-oks-tracking --tracking-thr ${TRACKING_THR} --euro]
Note that ${VIDEO_PATH} can be the local path or URL link to video file.
Examples:
python demo/bottom_up_pose_tracking_demo.py \
    configs/body/2d_kpt_sview_rgb_img/associative_embedding/coco/hrnet_w32_coco_512x512.py \
    https://download.openmmlab.com/mmpose/bottom_up/hrnet_w32_coco_512x512-bcb8c247_20200816.pth \
    --video-path demo/resources/demo.mp4 \
    --out-video-root vis_results
Speed Up Inference
Some tips to speed up MMPose inference:
For top-down models, try to edit the config file. For example,
set
flip_test=Falsein topdown-res50.set
post_process='default'in topdown-res50.use faster human detector or human tracker, see MMDetection or MMTracking.
For bottom-up models, try to edit the config file. For example,
2D Human Whole-Body Pose Demo

2D Human Whole-Body Pose Top-Down Image Demo
Using gt human bounding boxes as input
We provide a demo script to test a single image, given gt json file.
python demo/top_down_img_demo.py \
    ${MMPOSE_CONFIG_FILE} ${MMPOSE_CHECKPOINT_FILE} \
    --img-root ${IMG_ROOT} --json-file ${JSON_FILE} \
    --out-img-root ${OUTPUT_DIR} \
    [--show --device ${GPU_ID or CPU}] \
    [--kpt-thr ${KPT_SCORE_THR}]
Examples:
python demo/top_down_img_demo.py \
    configs/wholebody/2d_kpt_sview_rgb_img/topdown_heatmap/coco-wholebody/hrnet_w48_coco_wholebody_384x288_dark_plus.py \
    https://download.openmmlab.com/mmpose/top_down/hrnet/hrnet_w48_coco_wholebody_384x288_dark-f5726563_20200918.pth \
    --img-root tests/data/coco/ --json-file tests/data/coco/test_coco.json \
    --out-img-root vis_results
To run demos on CPU:
python demo/top_down_img_demo.py \
    configs/wholebody/2d_kpt_sview_rgb_img/topdown_heatmap/coco-wholebody/hrnet_w48_coco_wholebody_384x288_dark_plus.py \
    https://download.openmmlab.com/mmpose/top_down/hrnet/hrnet_w48_coco_wholebody_384x288_dark-f5726563_20200918.pth \
    --img-root tests/data/coco/ --json-file tests/data/coco/test_coco.json \
    --out-img-root vis_results \
    --device=cpu
Using mmdet for human bounding box detection
We provide a demo script to run mmdet for human detection, and mmpose for pose estimation.
Assume that you have already installed mmdet.
python demo/top_down_img_demo_with_mmdet.py \
    ${MMDET_CONFIG_FILE} ${MMDET_CHECKPOINT_FILE} \
    ${MMPOSE_CONFIG_FILE} ${MMPOSE_CHECKPOINT_FILE} \
    --img-root ${IMG_ROOT} --img ${IMG_FILE} \
    --out-img-root ${OUTPUT_DIR} \
    [--show --device ${GPU_ID or CPU}] \
    [--bbox-thr ${BBOX_SCORE_THR} --kpt-thr ${KPT_SCORE_THR}]
Examples:
python demo/top_down_img_demo_with_mmdet.py \
    demo/mmdetection_cfg/faster_rcnn_r50_fpn_coco.py \
    https://download.openmmlab.com/mmdetection/v2.0/faster_rcnn/faster_rcnn_r50_fpn_1x_coco/faster_rcnn_r50_fpn_1x_coco_20200130-047c8118.pth \
    configs/wholebody/2d_kpt_sview_rgb_img/topdown_heatmap/coco-wholebody/hrnet_w48_coco_wholebody_384x288_dark_plus.py \
    https://download.openmmlab.com/mmpose/top_down/hrnet/hrnet_w48_coco_wholebody_384x288_dark-f5726563_20200918.pth \
    --img-root tests/data/coco/ \
    --img 000000196141.jpg \
    --out-img-root vis_results
2D Human Whole-Body Pose Top-Down Video Demo
We also provide a video demo to illustrate the results.
Assume that you have already installed mmdet.
python demo/top_down_video_demo_with_mmdet.py \
    ${MMDET_CONFIG_FILE} ${MMDET_CHECKPOINT_FILE} \
    ${MMPOSE_CONFIG_FILE} ${MMPOSE_CHECKPOINT_FILE} \
    --video-path ${VIDEO_PATH} \
    --out-video-root ${OUTPUT_VIDEO_ROOT} \
    [--show --device ${GPU_ID or CPU}] \
    [--bbox-thr ${BBOX_SCORE_THR} --kpt-thr ${KPT_SCORE_THR}]
Note that ${VIDEO_PATH} can be the local path or URL link to video file.
Examples:
python demo/top_down_video_demo_with_mmdet.py \
    demo/mmdetection_cfg/faster_rcnn_r50_fpn_coco.py \
    https://download.openmmlab.com/mmdetection/v2.0/faster_rcnn/faster_rcnn_r50_fpn_1x_coco/faster_rcnn_r50_fpn_1x_coco_20200130-047c8118.pth \
    configs/wholebody/2d_kpt_sview_rgb_img/topdown_heatmap/coco-wholebody/hrnet_w48_coco_wholebody_384x288_dark_plus.py \
    https://download.openmmlab.com/mmpose/top_down/hrnet/hrnet_w48_coco_wholebody_384x288_dark-f5726563_20200918.pth \
    --video-path https://user-images.githubusercontent.com/87690686/137440639-fb08603d-9a35-474e-b65f-46b5c06b68d6.mp4 \
    --out-video-root vis_results
Speed Up Inference
Some tips to speed up MMPose inference:
For top-down models, try to edit the config file. For example,
set
flip_test=Falsein pose_hrnet_w48_dark+.set
post_process='default'in pose_hrnet_w48_dark+.use faster human bounding box detector, see MMDetection.
3D Mesh Demo

3D Mesh Recovery Demo
We provide a demo script to recover human 3D mesh from a single image.
python demo/mesh_img_demo.py \
    ${MMPOSE_CONFIG_FILE} ${MMPOSE_CHECKPOINT_FILE} \
    --json-file ${JSON_FILE} \
    --img-root ${IMG_ROOT} \
    [--show] \
    [--device ${GPU_ID or CPU}] \
    [--out-img-root ${OUTPUT_DIR}]
Example:
python demo/mesh_img_demo.py \
    configs/body/3d_mesh_sview_rgb_img/hmr/mixed/res50_mixed_224x224.py \
    https://download.openmmlab.com/mmpose/mesh/hmr/hmr_mesh_224x224-c21e8229_20201015.pth \
    --json-file tests/data/h36m/h36m_coco.json \
    --img-root tests/data/h36m \
    --out-img-root vis_results
3D Hand Demo

3D Hand Estimation Image Demo
Using gt hand bounding boxes as input
We provide a demo script to test a single image, given gt json file.
python demo/interhand3d_img_demo.py \
    ${MMPOSE_CONFIG_FILE} ${MMPOSE_CHECKPOINT_FILE} \
    --json-file ${JSON_FILE} \
    --img-root ${IMG_ROOT} \
    [--camera-param-file ${CAMERA_PARAM_FILE}] \
    [--gt-joints-file ${GT_JOINTS_FILE}]\
    [--show] \
    [--device ${GPU_ID or CPU}] \
    [--out-img-root ${OUTPUT_DIR}] \
    [--rebase-keypoint-height] \
    [--show-ground-truth]
Example with gt keypoints and camera parameters:
python demo/interhand3d_img_demo.py \
    configs/hand/3d_kpt_sview_rgb_img/internet/interhand3d/res50_interhand3d_all_256x256.py \
    https://download.openmmlab.com/mmpose/hand3d/internet/res50_intehand3d_all_256x256-b9c1cf4c_20210506.pth \
    --json-file tests/data/interhand2.6m/test_interhand2.6m_data.json \
    --img-root tests/data/interhand2.6m \
    --camera-param-file tests/data/interhand2.6m/test_interhand2.6m_camera.json \
    --gt-joints-file tests/data/interhand2.6m/test_interhand2.6m_joint_3d.json \
    --out-img-root vis_results \
    --rebase-keypoint-height \
    --show-ground-truth
Example without gt keypoints and camera parameters:
python demo/interhand3d_img_demo.py \
    configs/hand/3d_kpt_sview_rgb_img/internet/interhand3d/res50_interhand3d_all_256x256.py \
    https://download.openmmlab.com/mmpose/hand3d/internet/res50_intehand3d_all_256x256-b9c1cf4c_20210506.pth \
    --json-file tests/data/interhand2.6m/test_interhand2.6m_data.json \
    --img-root tests/data/interhand2.6m \
    --out-img-root vis_results \
    --rebase-keypoint-height
3D Human Pose Demo

3D Human Pose Two-stage Estimation Image Demo
Using ground truth 2D poses as the 1st stage (pose detection) result, and inference the 2nd stage (2D-to-3D lifting)
We provide a demo script to test on single images with a given ground-truth Json file.
python demo/body3d_two_stage_img_demo.py \
    ${MMPOSE_CONFIG_FILE_3D} \
    ${MMPOSE_CHECKPOINT_FILE_3D} \
    --json-file ${JSON_FILE} \
    --img-root ${IMG_ROOT} \
    --only-second-stage \
    [--show] \
    [--device ${GPU_ID or CPU}] \
    [--out-img-root ${OUTPUT_DIR}] \
    [--rebase-keypoint-height] \
    [--show-ground-truth]
Example:
python demo/body3d_two_stage_img_demo.py \
    configs/body/3d_kpt_sview_rgb_img/pose_lift/h36m/simplebaseline3d_h36m.py \
    https://download.openmmlab.com/mmpose/body3d/simple_baseline/simple3Dbaseline_h36m-f0ad73a4_20210419.pth \
    --json-file tests/data/h36m/h36m_coco.json \
    --img-root tests/data/h36m \
    --camera-param-file tests/data/h36m/cameras.pkl \
    --only-second-stage \
    --out-img-root vis_results \
    --rebase-keypoint-height \
    --show-ground-truth
3D Human Pose Two-stage Estimation Video Demo
Using mmdet for human bounding box detection and top-down model for the 1st stage (2D pose detection), and inference the 2nd stage (2D-to-3D lifting)
Assume that you have already installed mmdet.
python demo/body3d_two_stage_video_demo.py \
    ${MMDET_CONFIG_FILE} \
    ${MMDET_CHECKPOINT_FILE} \
    ${MMPOSE_CONFIG_FILE_2D} \
    ${MMPOSE_CHECKPOINT_FILE_2D} \
    ${MMPOSE_CONFIG_FILE_3D} \
    ${MMPOSE_CHECKPOINT_FILE_3D} \
    --video-path ${VIDEO_PATH} \
    [--rebase-keypoint-height] \
    [--norm-pose-2d] \
    [--num-poses-vis NUM_POSES_VIS] \
    [--show] \
    [--out-video-root ${OUT_VIDEO_ROOT}] \
    [--device ${GPU_ID or CPU}] \
    [--det-cat-id DET_CAT_ID] \
    [--bbox-thr BBOX_THR] \
    [--kpt-thr KPT_THR] \
    [--use-oks-tracking] \
    [--tracking-thr TRACKING_THR] \
    [--euro] \
    [--radius RADIUS] \
    [--thickness THICKNESS] \
    [--use-multi-frames] [--online]
Note that
${VIDEO_PATH}can be the local path or URL link to video file.You can turn on the
[--use-multi-frames]option to use multi frames for inference in the 2D pose detection stage.If the
[--online]option is set to True, future frame information can not be used when using multi frames for inference in the 2D pose detection stage.
Examples:
During 2D pose detection, for single-frame inference that do not rely on extra frames to get the final results of the current frame, try this:
python demo/body3d_two_stage_video_demo.py \
    demo/mmdetection_cfg/faster_rcnn_r50_fpn_coco.py \
    https://download.openmmlab.com/mmdetection/v2.0/faster_rcnn/faster_rcnn_r50_fpn_1x_coco/faster_rcnn_r50_fpn_1x_coco_20200130-047c8118.pth \
    configs/body/2d_kpt_sview_rgb_img/topdown_heatmap/coco/hrnet_w48_coco_256x192.py \
    https://download.openmmlab.com/mmpose/top_down/hrnet/hrnet_w48_coco_256x192-b9e0b3ab_20200708.pth \
    configs/body/3d_kpt_sview_rgb_vid/video_pose_lift/h36m/videopose3d_h36m_243frames_fullconv_supervised_cpn_ft.py \
    https://download.openmmlab.com/mmpose/body3d/videopose/videopose_h36m_243frames_fullconv_supervised_cpn_ft-88f5abbb_20210527.pth \
    --video-path https://user-images.githubusercontent.com/87690686/164970135-b14e424c-765a-4180-9bc8-fa8d6abc5510.mp4 \
    --out-video-root vis_results \
    --rebase-keypoint-height
During 2D pose detection, for multi-frame inference that rely on extra frames to get the final results of the current frame, try this:
python demo/body3d_two_stage_video_demo.py \
    demo/mmdetection_cfg/faster_rcnn_r50_fpn_coco.py \
    https://download.openmmlab.com/mmdetection/v2.0/faster_rcnn/faster_rcnn_r50_fpn_1x_coco/faster_rcnn_r50_fpn_1x_coco_20200130-047c8118.pth \
    configs/body/2d_kpt_sview_rgb_vid/posewarper/posetrack18/hrnet_w48_posetrack18_384x288_posewarper_stage2.py \
    https://download.openmmlab.com/mmpose/top_down/posewarper/hrnet_w48_posetrack18_384x288_posewarper_stage2-4abf88db_20211130.pth  \
    configs/body/3d_kpt_sview_rgb_vid/video_pose_lift/h36m/videopose3d_h36m_243frames_fullconv_supervised_cpn_ft.py \
    https://download.openmmlab.com/mmpose/body3d/videopose/videopose_h36m_243frames_fullconv_supervised_cpn_ft-88f5abbb_20210527.pth \
    --video-path https://user-images.githubusercontent.com/87690686/164970135-b14e424c-765a-4180-9bc8-fa8d6abc5510.mp4 \
    --out-video-root vis_results \
    --rebase-keypoint-height \
    --use-multi-frames --online
3D Multiview Human Pose Demo
3D Multiview Human Pose Estimation Image Demo
VoxelPose
We provide a demo script to test on multiview images with given camera parameters. To run the demo:
python demo/body3d_multiview_detect_and_regress_img_demo.py \
    ${MMPOSE_CONFIG_FILE} \
    ${MMPOSE_CHECKPOINT_FILE} \
    --out-img-root ${OUT_IMG_ROOT} \
    --camera-param-file ${CAMERA_FILE} \
    [--img-root ${IMG_ROOT}] \
    [--visualize-single-view ${VIS_SINGLE_IMG}] \
    [--device ${GPU_ID or CPU}] \
    [--out-img-root ${OUTPUT_DIR}]
Example:
python demo/body3d_multiview_detect_and_regress_img_demo.py \
    configs/body/3d_kpt_mview_rgb_img/voxelpose/panoptic/voxelpose_prn64x64x64_cpn80x80x20_panoptic_cam5.py \
    https://download.openmmlab.com/mmpose/body3d/voxelpose/voxelpose_prn64x64x64_cpn80x80x20_panoptic_cam5-545c150e_20211103.pth \
    --out-img-root vis_results \
    --camera-param-file tests/data/panoptic_body3d/demo/camera_parameters.json \
    --visualize-single-view
Data Preparation
Currently, we only support CMU Panoptic data format. Users can leave the argument --img-root unset to automatically download our default demo data (~6M). Users can also use custom data, which should be organized as follow:
├── ${IMG_ROOT}
    │── camera_parameters.json
    │── camera0
        │-- 0.jpg
        │-- ...
    │── camera1
    │── ...
The camera parameters should be a dictionary that include a key “cameras”. Under the key “cameras” should be a list of dictionaries containing the camera parameters. Each dictionary under the list should include a key “name”, the value of which is the directory name of images of a certain camera view.
{
 "cameras": [
  {"name": "camera0", ...},
  {"name": "camera1", ...},
  ...
}
Hand Gesture Recognition Demo
We provide a demo for gesture recognition with MMPose. This demo is built upon MMPose Webcam API.

Get started
Launch the demo from the mmpose root directory:
python demo/webcam_demo.py --config demo/webcam_cfg/gesture_recognition.py
Hotkeys
| Hotkey | Function |
|---|---|
| v | Toggle the gesture recognition result visualization on/off. |
| h | Show help information. |
| m | Show the monitoring information. |
| q | Exit. |
Note that the demo will automatically save the output video into a file gesture.mp4.
Configurations
Detailed configurations can be found in the config file. And more information about the gesture recognition model used in the demo can be found at the model page.
Webcam Demo
We provide a webcam demo tool which integrartes detection and 2D pose estimation for humans and animals. It can also apply fun effects like putting on sunglasses or enlarging the eyes, based on the pose estimation results.

Get started
Launch the demo from the mmpose root directory:
## Run webcam demo with GPU
python demo/webcam_demo.py

## Run webcam demo with CPU
python demo/webcam_demo.py --cpu
The command above will use the default config file demo/webcam_cfg/pose_estimation.py. You can also specify the config file in the command:
## Use the config "pose_tracking.py" for higher infererence speed
python demo/webcam_demo.py --config demo/webcam_cfg/pose_tracking.py
Hotkeys
| Hotkey | Function |
|---|---|
| v | Toggle the pose visualization on/off. |
| s | Toggle the sunglasses effect on/off. (NA for pose_trakcing.py) |
| b | Toggle the big-eye effect on/off. (NA for pose_trakcing.py) |
| h | Show help information. |
| m | Show the monitoring information. |
| q | Exit. |
Note that the demo will automatically save the output video into a file webcam_demo.mp4.
Usage and configuarations
Detailed configurations can be found in the config file.
Configure detection models Users can choose detection models from the MMDetection Model Zoo. Just set the
model_configandmodel_checkpointin the detector node accordingly, and the model will be automatically downloaded and loaded.## 'DetectorNode': ## This node performs object detection from the frame image using an ## MMDetection model. dict( type='DetectorNode', name='detector', model_config='demo/mmdetection_cfg/' 'ssdlite_mobilenetv2_scratch_600e_coco.py', model_checkpoint='https://download.openmmlab.com' '/mmdetection/v2.0/ssd/' 'ssdlite_mobilenetv2_scratch_600e_coco/ssdlite_mobilenetv2_' 'scratch_600e_coco_20210629_110627-974d9307.pth', input_buffer='_input_', output_buffer='det_result')
Configure pose estimation models In this demo we use two top-down pose estimation models for humans and animals respectively. Users can choose models from the MMPose Model Zoo. To apply different pose models on different instance types, you can add multiple pose estimator nodes with
cls_namesset accordingly.## 'TopDownPoseEstimatorNode': ## This node performs keypoint detection from the frame image using an ## MMPose top-down model. Detection results is needed. dict( type='TopDownPoseEstimatorNode', name='human pose estimator', model_config='configs/wholebody/2d_kpt_sview_rgb_img/' 'topdown_heatmap/coco-wholebody/' 'vipnas_mbv3_coco_wholebody_256x192_dark.py', model_checkpoint='https://openmmlab-share.oss-cn-hangz' 'hou.aliyuncs.com/mmpose/top_down/vipnas/vipnas_mbv3_co' 'co_wholebody_256x192_dark-e2158108_20211205.pth', labels=['person'], input_buffer='det_result', output_buffer='human_pose'), dict( type='TopDownPoseEstimatorNode', name='animal pose estimator', model_config='configs/animal/2d_kpt_sview_rgb_img/topdown_heatmap' '/animalpose/hrnet_w32_animalpose_256x256.py', model_checkpoint='https://download.openmmlab.com/mmpose/animal/' 'hrnet/hrnet_w32_animalpose_256x256-1aa7f075_20210426.pth', labels=['cat', 'dog', 'horse', 'sheep', 'cow'], input_buffer='human_pose', output_buffer='animal_pose')
Run the demo on a local video file You can use local video files as the demo input by set
camera_idto the file path.The computer doesn’t have a camera? A smart phone can serve as a webcam via apps like Camo or DroidCam.
Test the camera and display Run follow command for a quick test of video capturing and displaying.
python demo/webcam_demo.py --config demo/webcam_cfg/test_camera.py